Sunday 8 February 2015

Fashion Design - My First Ever Wedding Gown - part 2

Good evening Bloggers,
I have finally got around to finishing my wedding dress blog - it has taken a while!!

Ok where did I get to? I was working on the detail on the bodice in the last post I believe.

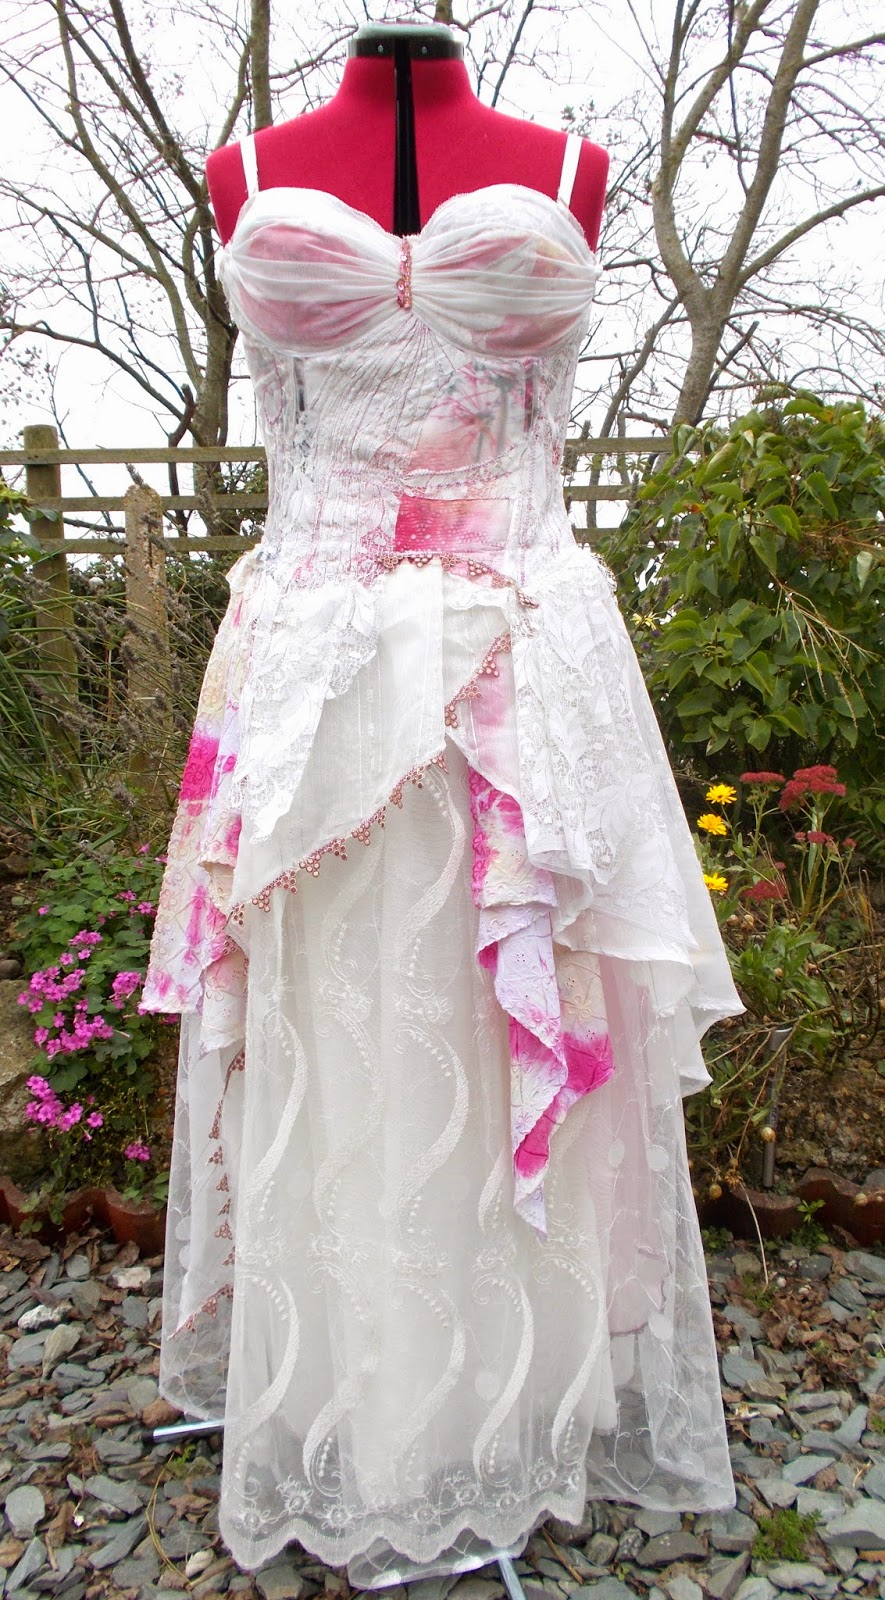
Once I had added most of the bodice detail, I began working on the bust part of the bodice. The hand dyed lace I had applied was way to bold and I started thinking about adding lace layers on top. I explored different ways to pleat the lace and added some beads in the centre.


I then started working on the layers of lace to complete the skirt. After much pleating, pinning, stitching and unpicking, the small areas of colour began to shimmer through the plainer lace layers.

I created a 'bustle' shape at the back of the dress with more pleats. I then began looking for the right colour ribbon for a large bow!!


Finally, the dress was complete. I feel I achieved my goal which was to create a Bohemian style wedding gown, mainly white with splashes of colour. Like no other wedding gown I had seen before!!!

My Bohemian pink lace wedding dress is for sale https://www.etsy.com/listing/205274995/bohemian-bridal-gown-bohemian-wedding?ref=shop_home_feat_3


Monday 15 December 2014

Fashion Design - My First Ever Wedding Gown

Good Evening Bloggers,

In 1987 as a GCSE Textiles student, I took part in my school fashion show. I modelled my GCSE contribution, a wrap around red and black check ankle length skirt with a pair of DM's !!!! I remember the Textiles teacher hosting the show and when I walked out, she described my outfit as 'Very Claire'!!!!! Although it was the first skirt I had ever made, I knew I could and would one day do better. One of the A-Level students, Mel had made a beautiful wedding dress and an old friend of mine, Lynne modelled it - she looked absolutely amazing. One day, I thought, one day................


Spring 2014, I attended a Shelly Goldsmith's Transfer Printing workshop at The Beaney in Canterbury, Kent. She asked us to bring synthetic fabric to print on. I took lingerie which I printed, frazzled and burnt in places with the iron!!!
I dumped the printed corset in my scrap fabric box and expected it would never see the light of day until ...........................................

I went on my annual holiday to Turkey and purchased a suitcase full of white lace fabric. You guessed it, my dreams of making a wedding dress came flooding back. But this was to be no ordinary wedding dress, oh no, this would need to be a funky Bohemian style wedding dress with splashes of colour and a burnt, transfer printed corset!!!!!

 I started on the bust with some hand dyed lace, then began working on layering up lace around the corset. I left pieces hanging hoping they would tie into the design later and create some interesting shapes.

I then began covering each of the corset panels with lace and stitched various patterns in contrasting threads on top.

 At this point, realisation dawned that this was indeed looking very much like a funky wedding gown!! Day and night it was on my mind and I was planning the next section. I just could not wait until my days off when I could continue making the dress.

To be continued ...................................................................................................................

Sunday 23 November 2014

Golden Ethnic Dress - Bohemian Fashions

Evening readers, are you ready to read more ramblings about my passion for making something from nothing!!??

I wanted to make a dress completely from scratch. I had some ideas about the shape and general design but I also wanted the dress to 'speak to me' along the way. I love it when I pick up unusually shaped scraps of material in my fabric boxes and find they are just the right shape for  a section of the garment. Often, these pieces are shapes that I would never, ever think to actually cut to fit in a particular space though - this is where the garment appears to construct itself.

I began with some contrasting colour satin fabrics like this ........


I worked down from the shoulders and chest to the waist and hips with a lovely tapestry fabric and added some darts to give the garment more shape.


I like to work on the back and sides of the garment before the front gets to detailed otherwise the front gets all the attention and becomes a little to fussy!


Always the trickiest part, the skirt. I find that the bodice comes together pretty quickly but the skirt takes a lot more pinning, pleating tacking, removing, starting again, cup of tea!!!!

The number of different fabrics I pleated, pinned, photographed and removed was bordering on the ridiculous!!

Finally, the dark purple seemed to be the best fit from the hundreds of pieces of fabric I scanned in my workshop.. It is actually the lining of an old 'Monsoon' skirt.

Finally, I added some unusual wool around the hips that I purchased in my favourite haberdashery shop in Didim, Turkey. It looks great but was a nightmare to stitch. In the end, I resorted to giving the sewing machine a tea break and hand stitched it in place.

The end result ..................

I hope you like it. Further images and information can be found in my Etsy and Folksy shops (scroll down for the links).


https://www.etsy.com/listing/199685870/ethnic-dress-bohemian-gypsy-shabby-chic?

https://folksy.com/items/6516287-Ethnic-Dress-Bohemian-Gypsy-Shabby-Chic-Romantic-Fantasy-Prom-Dress-Unique-


Fashion Design - The Creation of 'Autumn Glow' - Bohemian Fashion

Good Evening Bloggers,

It has been over a year since writing my last post. Due to circumstances beyond my control I was unable to post images on here as the settings had been changed by the 'powers that be'!!!!! Finally I think I may just have cracked it. This post was actually written initially in October 2013 but left unfinished until now............

I have made many, many new garments over the last year and will post these as regularly as I can so long as I continue being able to upload photos!!

Autumn Glow was created in Autumn 2013 and it all began with a corset my sister gave me, just here.................................................................I stitched layers of ribbon, lace and other fabrics onto the corset in Autumn colours.


 Then I started working on the skirt, layering fabrics in contrasting colours.


I added a few tucks, pleats and gathers here and there to create an asymmetric hemline. As always, some fabrics are new, others are recycled.


Finally the skirt was complete and stitched together with the bodice. I added detail on the back of the flowing skirt and took some photos in the Autumn sun.


'Autumn Glow' is for sale in both my Etsy and Folksy shops. I hope you like her!!!

https://www.etsy.com/listing/178010348/autumn-glow-green-dress-boho-hippie?

https://folksy.com/items/5450181-Autumn-Glow-Green-Dress-Bohemian-Hippie-Romantic-Corset-Burlesque-Steampunk


Monday 7 October 2013

Transfer Printing Workshop with Cas Holmes

Good Evening Bloggers,

I was fortunate enough to join Cas Holmes for a 'Transfer Printing' workshop which focussed on creating collages with depth by overlaying images and text.

We experimented with a range of different transferable materials on different papers and fabrics.

We experimented with layering the transfers to create unexpected effects.

We then explored compositions by layering up, cutting out and moving around sections of fabric, paper and prints.

This is the part I found the most tricky. It is very hard to cut into a beautiful print or even a photocopied image on paper just in case once cut, it seems wrong. I guess the trick is to have confidence in your ability to make choices and if you make the wrong choice this time, learn from it. Cut pieces which may not work in this composition, could work in another so keep hold of them!!


Cas working on her composition which included a beautiful Japanese bowl shape.


I laid out 2 composition ideas, both about A3 size. Cas told me to work on a smaller scale initially as a tool to help plan a composition - something I find hard to do as a painter who prefers to work on large and massive size canvas!!

 Once I sized down the scale of my work, I finally began to create a piece that I felt was worth developing. I layered up factory printed fabric and dyed lace with transfer printed translucent synthetic fabric on top. I love the way the viewer can see glimpses of the images underneath.

I roughly stitched down the fabrics on the machine then began hand stitching a few details with embroidery threads.

The final piece is not yet finished and I still have a couple of bits pinned on temporarily whilst I 'live' with them and make decisions as to whether or not they can 'move in'!! Cas would say they are being 'Auditioned'!!!

I had a very enjoyable day, learned so much and feel exhausted (too much thinking and decision making). I cannot wait until Thursday when I have some time at home to work on another composition using the prints made today.

Thank-you for reading and commenting on my Blog,
Claire x

Sunday 15 September 2013

Chinese Dragon Dress - Final part (4)

Good Evening Bloggers,

Although I finished this dress a while ago, I have only just had chance to update my blog. It will be a short and sweet one!!

I continued adding fabric pieces to fill out the hanky hem. I then added lengths of lace here and there. I created a 'u shape' with the pale pink piece of lace and secured it with a pink diamante button (purchased in Istanbul). I also added the gold and blue band around the 'v shaped' waist to define the waist and hip shapes.
The detail on the bodice was added next after lots of draping and pinning different decorative trimmings. I eventually decided on a range of trimmings, each with a small amount of gold colour in them, again these are from Istanbul.

 
The area I am the least happy with is the back of the dress. I may well go back to it one day and rethink. I began by hanging a few pieces of fabric 'hanky style'. They looked a little 'lost' and 'flat' so I pulled them into 'u shapes' and secured them under the gold waistband. It reminds me a little of a 'bustle' at the back of the dress.

The shoulder straps are both different pieces of lace and underneath them are bra straps which are adjustable for comfort.


Tuesday 13 August 2013

Chinese Dragon Dress - Part 3

Evening Bloggers,
I am afraid I have had to write part 2 and 3 of this blog both on the same night. Having been away on holiday for 3 weeks, I had no time to write part 2 sooner. At this point, I had already worked on the dress for approximately 15 hours.


First I removed all the pieces I had pinned onto the skirt. This was a little traumatic as I quite liked the overall effect but it had to be done in order to progress properly. Now the bodice was complete, I decided to add a long zip in the back. This is the zip from the original blue dress. I liked it as it was already decorated with sequins. Adding the zip at this stage was helpful as it can be time consuming having to pin the bodice onto the mannequin each time it is removed and replaced (many, many times!) The zip assists in holding the bodice on quite firmly.

Next, I hand pleated the blue and green skirt pieces around the waist giving a little fullness in this area and attached them to the v-shaped waist on the bodice. I extended the zip down through the skirt.

I was not happy with the way the front of the skirt hung where the blue and green fabrics joined so I added a v-shaped piece of another fabric between them.

At this stage, the skirt looks very uninspiring in my opinion - time to continue my favourite pastime...... experimenting with different colours, textures, shapes and pinning fabric scraps together!!


I considered bringing the hanky hem scraps up above the v-shaped waistline but once I had pinned a few pieces there, I realised it would not work visually. With the hanky hem spilling down from the waist, it gave me the opportunity to emphasise the V-shape by adding a lace or decorative trimming. I pinned many different ones on before making my final decision (surprise, surprise).

Now with the layers being added, I am happy the dress is beginning to become more shapely and visually interesting. There is still a long way to go though!

Total hours work today - 4.